If you want to move or backup your website you need to import and export MySQL Databases. In this tutorial, I am going to show you how to import and export MySQL databases using the command line and phpMyAdmin.
Import and Export MySQL Databases
You can import or export using command line. Let’s explain
Import and Export using Command Line in Ubuntu
If you are using any Linux-based operating system. Let’s take Ubuntu as an example.
You can use the terminal to import or export the database as a MySQL database dump.
Step 1: Export MySQL database using Command Line
To export MySQL database, first confirm the database name. let’s assume you are exporting sample_db. Run following command to export the database.
mysqldump -u root -p test_db > test_db.sqlwhen you run this command it will ask for password, type the password to export the database.

Now, confirm the export by following command
head -n 5 test_db.sqlOutput
-- MySQL dump 10.13 Distrib 8.0.25, for Linux (x86_64)
--
-- Host: localhost Database: test_db
-- -----------------------------------------------------
-- Server version 8.0.25-0ubuntu0.20.04.1The head command will print first 5 lines of the MySQL dump.
Step 2: Import MySQL database using Command Line
To import MySQL database, first you need to create a blank database, where you will import the exported database dump.
To create database, first login to MySQL dashboard by running following command.
$ mysql -u root -pWhen you run above command, it will ask for password. By inserting password login to MySQL dashboard and create database by following command.
mysql> CREATE DATABASE test_db_import;Output
mysql> CREATE DATABASE test_db_import;
Query OK, 1 row affected (0.01 sec)Now, logout from the mysql dashboard by typing exit. Run the following command to import the database dump to newly created blank database.
mysql -u root -p test_db_import < test_db.sqlWhen you run this command, again it will ask for password and will not show anything on successful import.
Import and Export Database using phpMyAdmin
If you have cPanel access or you have installed phpMyAdmin on your server, you can export and import via phpMyAdmin.
Step1: Export using cPanel phpMyAdmin
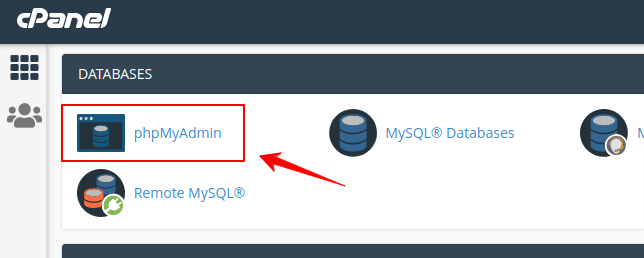
First login to cPanel, the go to phpMyAdmin under databases.

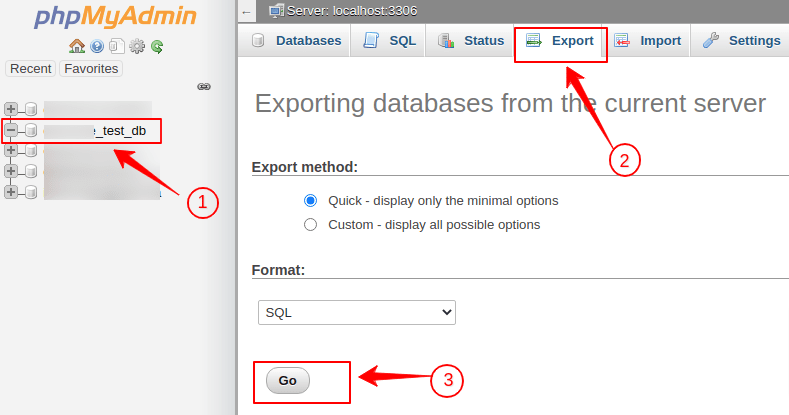
Now select the database then go to export and click on Go.

Step2: Import using cPanel phpMyAdmin
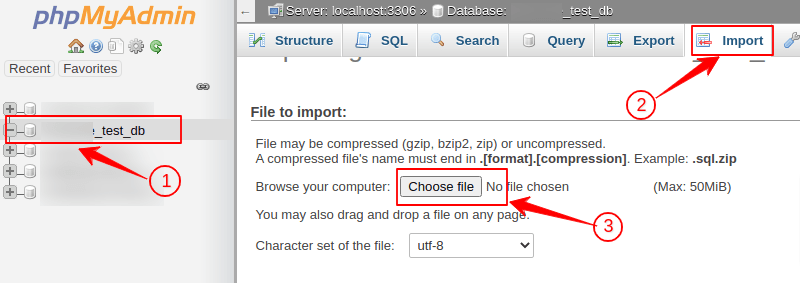
As mentioned above login to phpMyAdmin and click import. Now upload the the database dump and scroll down to click on Go

You database dump is imported now.
Conclusion
In this article, you have learned to import and export MySQL Databases. Follow this article thoroughly to import and export. If you have any doubts feel free to contact me, I will definitely try to help you. Also, you can join our elite Facebook group to get direct help from me. If you like this tutorial, please share this article on your social media handle.


