Docker is an open-source containerization platform built on Linux. According to a stackoverflow recent survey, Docker is loved by more than 73 percent of developers. In this article, learn how to install Docker on Ubuntu 20.04.
Docker allows you to quickly build, test, and deploy applications as portable containers that can run virtually anywhere. A container represents a runtime for a single application and includes everything the software needs to run. Docker containers can easily ship to the remote location on start there without making the entire application setup.
Docker can be installed from the Ubuntu repositories, but the downloading version may not be the latest. Alternatively, you can install Docker by adding the PPA to the system provided by Docker official site. In this tutorial, we will install docker using PPA.
Docker Key Features
- Consistent and Isolated Environment
- Cost-effectiveness with Fast Deployment
- Mobility – Ability to Run Anywhere
- Repeatability and Automation
- Test, Roll Back and Deploy
- Collaboration, Modularity and Scaling
Prerequisites
- Ubuntu 20.04 LTS Focal Fossa.
- A user with SUDO privileges.
Installation Steps
Step 1: Update the System with Dependencies Download
First update the system repositories with all the dependencies to install the Docker container by following commands.
$ sudo apt update
$ sudo apt install curl apt-transport-https ca-certificates software-properties-common
Step 2: Install Docker on Ubuntu 20.04
Now, import GPG Key to verify the signature before installation. To import, run the following curl command.
$ curl -fsSL https://download.docker.com/linux/ubuntu/gpg | sudo apt-key addOutput should be
okAfter adding the GPG, add the Docker repositories on the Ubuntu system. It is a mandatory step to install a Docker container.
$ sudo add-apt-repository "deb [arch=amd64] https://download.docker.com/linux/ubuntu focal stable"Once the docker repository is added to the system, you can install docker on Ubuntu 20.04 by running the following commands.
$ sudo apt update
$ sudo apt install docker-ce docker-ce-cli containerd.io
Hurray, you have successfully installed Docker on Ubuntu 20.04. After the installation is completed, docker will be started automatically.
To check the docker status, run the following command.
$ sudo systemctl status dockerOutput should be something like this

Step 3: Managing Docker Services
Docker is managed by systemd daemon. Like other Ubuntu services, you can start, stop, restart docker services using the following commands.
$ sudo systemctl stop docker
$ sudo systemctl start docker
$ sudo systemctl restart docker
Verify Docker Installation
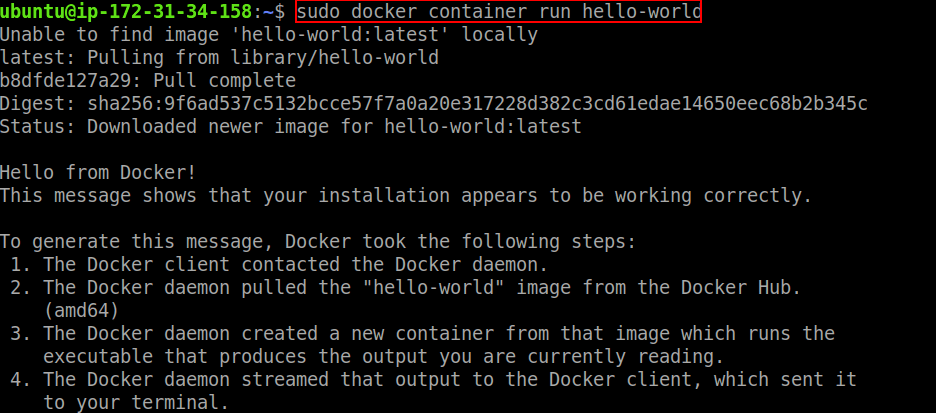
After Docker installation on Ubuntu, check the installation by running a hello world example to make sure everything is running smoothly. To run Docker hello world example, open a terminal and type
$ sudo docker container run hello-worldYou should see something like below

Uninstalling Docker
Run the following commands to stop all running containers and remove all docker objects.
$ docker container stop $(docker container ls -aq)
$ docker system prune -a --volumes
Now, uninstall Docker by following command.
$ sudo apt purge docker-ce
$ sudo apt autoremove
Conclusion
In this tutorial, you have learned how to install Docker on Ubuntu 20.04. If you have any doubts feel free to contact me, I will definitely try to help you. Also, you can join our elite Facebook group to get direct help from me. If you like this tutorial, please share this article on your social media handle.


