

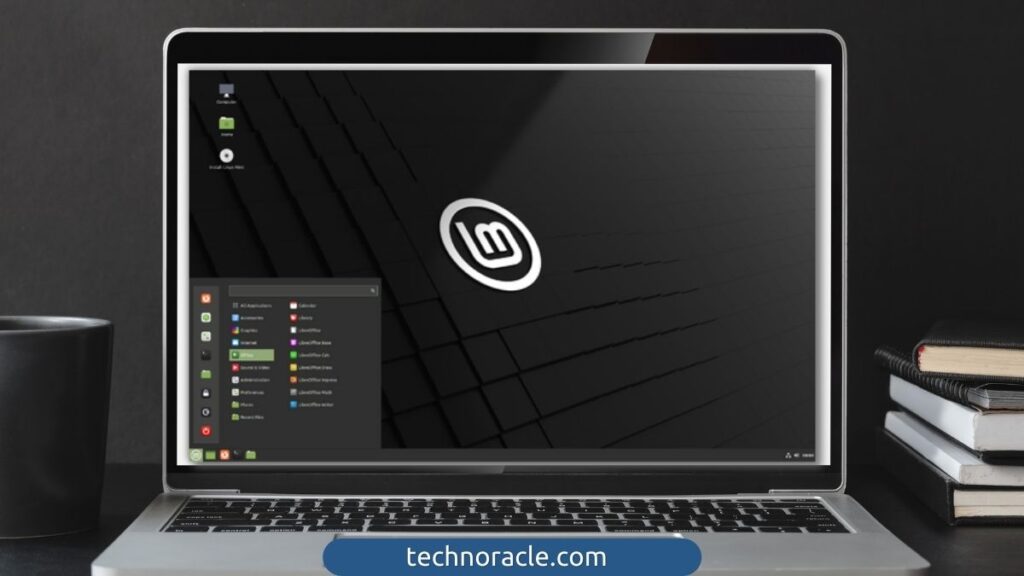
Linux Mint 21 Vanessa Cinnamon Edition probably doesn’t require much introduction and with the new release of Linux Mint 21, there is a question about how to install Linux Mint 21 Vanessa Cinnamon Edition. The Linux kernel is the most popular choice for many developers and programmers all over the globe since it can be used on PCs, laptops, servers, Android operating systems, and so on.
To put it another way, Linux is practically everywhere. Despite the fact that the “Year of the Linux Desktop” remains a myth, many individuals gladly utilize the Linux operating system on their desktop computers.
Many authors have offered their Linux expertise and open-source tools to demonstrate this throughout the years. Over time, Linux, a free and open-source operating system, has given birth to a number of alternative variants.
Types of Linux Distros
The primary purpose of this is to spread its wings in order to fence in a large group of consumers with diverse interests. These users vary from home/desktop to enterprise. The most popular Linux distributions are
- Debian: Debian is well-known for being the mother of various other distributions, including Ubuntu, Deepin, and Mint, which it has also fed. It uses APT as its primary package manager.
- Ubuntu: Canonical maintains this Linux distribution. It is a popular choice for both beginners and pros. Because it is based on Debian, it also employs APT as a package manager.
- Gentoo: This Linux distribution is designed for professionals and experts who place a high value on the applications they use. These individuals might be program developers, system and network administrators, and so on. It includes portage as the package management.
- OpenSUSE: It offers two SUSE branches: SUSE Leap for desktop and corporate usage, and SUSE Tumbleweed, a rolling release featuring the most recent software stacks and IDEs. It is dependent on Yast and packages management.
- Arch Linux: Arch Linux is a compact Linux distribution designed for specialists. It allows users to personalize the system as they see fit. Pacman is the default package manager, but AUR (Arch User Repository) may also be used.
- Red Hat Enterprise Linux: Red Hat Enterprise Linux (RHEL) is a Linux distribution designed for corporate and professional usage. It is popular because of its stability and frequent security fixes that increase system security.
Fedora: Because of its simplicity, it is often regarded as one of the most user-friendly Linux distributions. Fedora is a RedHat-based operating system that provides a development and testing environment for Rhel-based applications.
What is Linux Mint?
Linux Mint is a very well-known Ubuntu-based Linux distribution. Despite its youth, it has generated attractive and user-friendly versions that have been favorably received by both desktop consumers and professionals.
Clement Lefebvre, a French developer, founded Linux Mint in 2006. He created Linux Mint 1.0 “Ada” with numerous areas of research to add flavor, which was launched in August 2006.
Linux Mint 2.1 and 2.2 were launched in 2007, featuring a complete complement of multimedia codecs. This greatly enhanced its renown. The next year, Linux Mint 3.0 “Cassandra” was published as the first version to have the Mint logo. Several versions were created throughout time, and in 2010, Mint 8 “Helena” was published. With the release of Windows Vista a few years earlier, this version drew the attention of many Windows users.
Other releases followed, including Mint 12 “Lisa” in 2011, Mint 13 “Maya” in 2012, Mint 15 “Olivia” in 2013, Mint 16 “Petra” in 2013, Mint 17 “Quiana” in 2014, Mint 18 “Sarah” in 2017, and so on. The most recent release version is Linux Mint 21 “Vanessa,” which is a Long Term Release that will be maintained until 2027. The Linux kernel 5.15 and the Ubuntu 22.04 package base are included in this release version.
Create the Linux Mint 21 ISO Bootable Media
To create a bootable drive you need to download the ISO file for Linux Mint 21 Vanessa Cinnamon Edition. The ISO file must be downloaded from the Official Page of Linux Mint and you can find it here: Linux Mint ISO
Now before downloading select the preferred Edition from there.
- Cinnamon: a modern, innovative, and full-featured desktop
- MATE: a more traditional, but faster desktop
- Xfce: this is the most lightweight desktop
Now Create a bootable device that can be used for installation on a physical computer, such as a laptop or PC, after you have the ISO file.
There are several methods and tools to create a bootable drive:
- Ventoy: Linux application to create bootable disks.
- Rufus: Popular tool used on Windows and macOS operating systems to create a bootable drive.
- woeUSB for Linux: This is also another tool to create a bootable drive for installation.
- Balena Etcher: It can be used to create a bootable disk.
You can also create a bootable drive from the Linux command using the terminal.
# Identify USB device#
sudo lsblk

# Flash Linux Mint 21 to USB drive#
sudo dd bs=4M if=./linuxmint-21-*-64bit.iso of=/dev/sdX status=progress oflag=sync
Now you have to replace linuxmint-21-*-64bit.iso with the correct path of the ISO file downloaded on your system and /dev/sdX with the path of your attached USB disk.
How to Install Linux Mint 21 on a PC or Laptop
After you have completed the aforementioned settings, you are ready to begin the installation on your system. Insert the generated disk into a physical system and change your boot settings to boot from it.
Now this installation will be launched on a GNU Linux Mint 21 splash screen.

Press enter on Start Linux Mint 21 option to begin install Linux Mint 21. Linux Mint 21 will start in Live Mode with the installer on it after a few times.

1. Select Language and Keyboard
Now Select the preferred language of your choice.

Now select the preferred Keyboard.

2. Install multimedia codec
The next option needs you to consent to the installation of a multimedia codec. Some videos need this to play. If you are not connected to the network, you must choose a network.

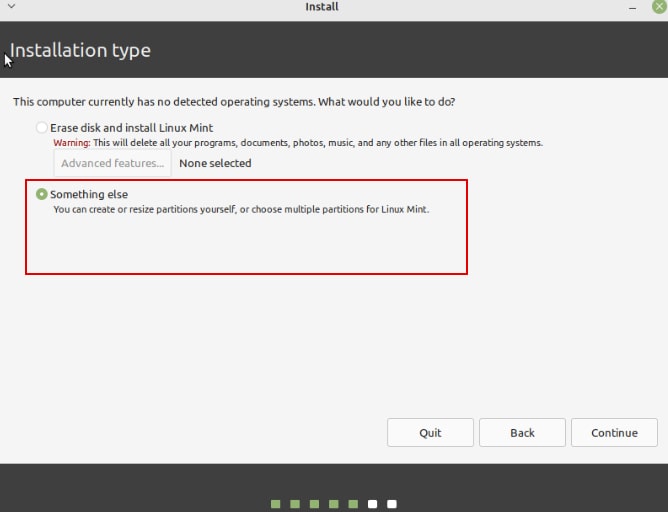
3. Disk Partitioning
You will be asked to choose the kind of installation. If this is a new installation, you may opt to Erase the drive and install Linux Mint, or you should probably delete anything present on the disk.

This option also offers Advanced features if you use LVM partitions
On the second option a user can able to specify the partitions they want to use.
Here you have to mount the created partitions on the root /directory.
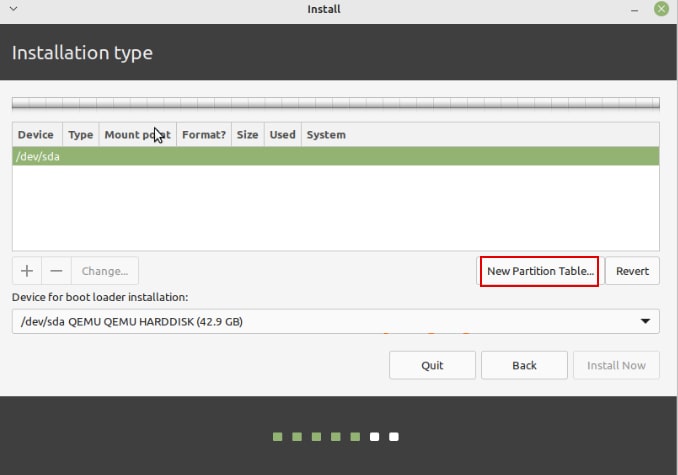
Create a swap partition in the remaining space as well. This will be utilized for hibernation as well as a safety buffer if your computer’s RAM runs out.
Next, create an EFI system partition.
You must also establish a Reserved BIOS region with a minimum size of 1MB.
After making the desired configuration on the system for partitioning, Click on Install Now option to start install Linux Mint 21.

Now agree to the changes you have made to the system by selecting the continue option.
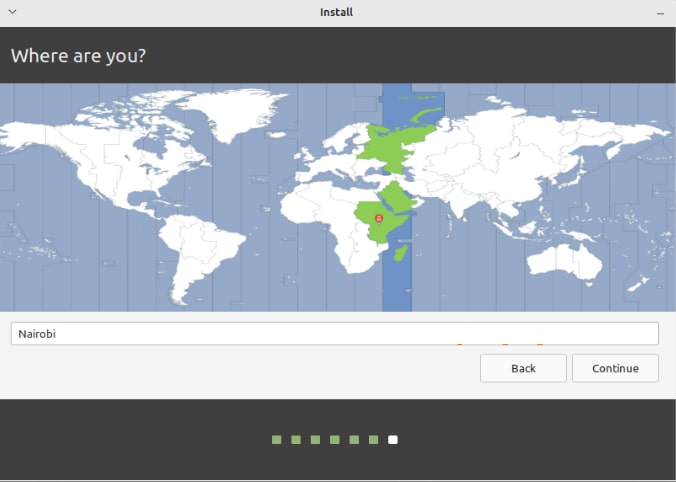
4. Timezone
Select the desired timezone from the given locations by clicking on the map to continue Linux Mint 21 installation.
5. User Preferences/ Creation
You must establish a system user and password, as well as the user name of the system.

6. Install the Base System
Once the necessary information has been entered, click proceed, and the setup will begin as displayed.
Now just wait for the installation to complete and don’t press the skip button or shut down or restart your system during installation.

7. Reboot the System
Click Restart Now, and then eject the installation drive to ensure that it is able to boot from the hard drive.
After rebooting your Linux Mint 21 Vanessa Cinnamon Edition is ready to use and install other required software on the system.
Read More: Upgrade Ubuntu 20.04 to 22.04 LTS [Super Simple Guide]
Conclusion
Linux Mint 21 is very useable for a wide range of users due to its availability in three unique distributions: The New Cinnamon edition (Cinnamon desktop environment), Xfce edition (Xfce desktop environment), and MATE edition (with MATE desktop environment). In this article, you have learned to install Linux Mint 21.
Also Linux Mint or any other Distro is so useful for a developer and with the new version released it has to be updated or installed So we hope this article was useful in installing and using the Linux Mint 21 edition.


