


A freshly installed WordPress site gives you errors when you try to upload large-size themes or plugins.
In this article, I will cover how to increase file upload size in WordPress.
So let’s dive in.
How to Increase File Upload Size
Increase File Upload Size in WordPress on Cpanel
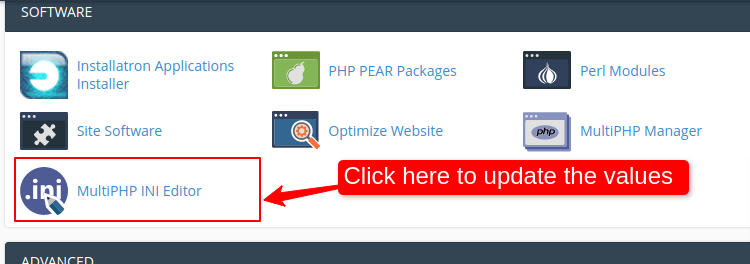
If your website is hosted on CPanel, first open Cpanel account and go to MultiPHP INI Editor.
Step 1: Open CPanel dashboard and go to MultiPHP INI editor.
Step 2: Select the PHP INI location
Now select the location, where you want to update the values. You can choose the website to update the values. Also, you can update all the websites by selecting the home directory. Choose one of them.
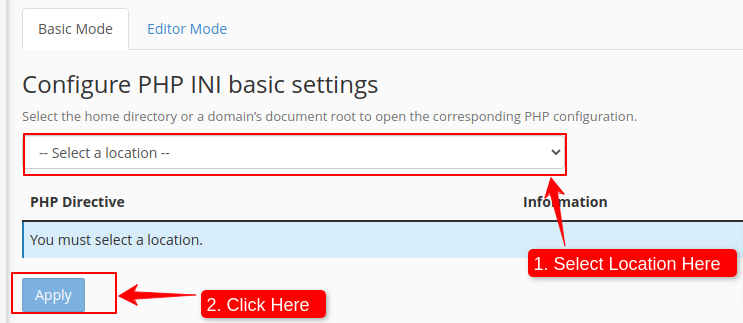
Step 3: Update PHP values
Now update the file with following values and click Apply.
- upload_max_filesize
- post_max_size
- memory_limit
- max_execution_time
- max_input_time
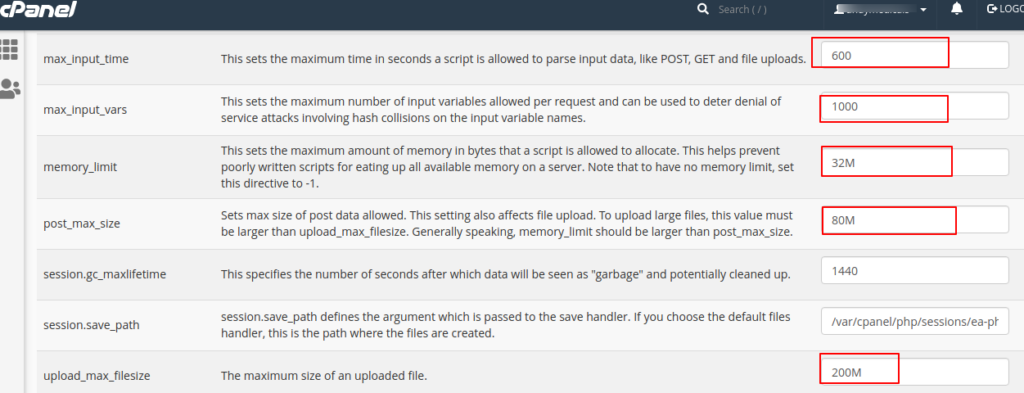
Hurray, you updated your PHP INI file successfully. Now you can upload your wordpress theme files easily.
Increase File Upload Size in WordPress for Cloud hosting | VPS hosting
If you are using cloud hosting or any VPS hosting to host your website. In that case, you can update the PHP INI file by accessing your web server using SSH.
Step 1: SSH into the Web Server
SSH into the Web Server. In my case, I am using the Digital Ocean Ubuntu Server.
You can find php.ini file using following ways.
Step 2: Find PHP INI file on the Ubuntu Server
By default, the PHP INI file is found under the following path.
/etc/php/7.4/apache2/php.iniAfter finding the PHP INI file, you have to open the file using any text editor in the terminal. You can use the VI text editor to update the PHP values.
Step 3: Update PHP values in PHP INI Ubuntu Server
To open the file and update the values, use following commands.
# vi /etc/php/7.4/apache2/php.iniNow search the file by typing “/” and following file_upload_max. It will highlight the file_upload_max value in the file. Now you can change the value. Do the same for all the values.
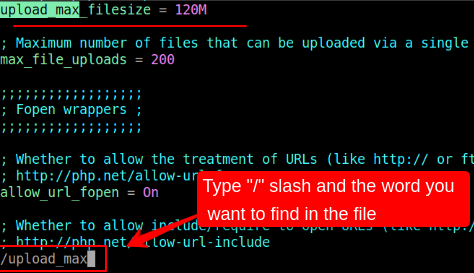
After updating all the PHP values, save the file and try to upload the large theme in wordpress.
Read More: How to Install LAMP on Ubuntu 20.04
Conclusion
In this article, you have learned how to increase file upload size in WordPress. Now update your PHP INI file and upload your WordPress site theme or any other file. If you like this article, feel free to share this article on your social media.
")
")
