


Your website is hosted on shared hosting or any VPS and wants to upgrade your server to AWS for better speed, security, scalability, and performance. In this article, I will explain how to migrate a WordPress site to AWS step by step. So let’s dive in
WordPress Site Migration to AWS
First of all, you should take backup of website files, emails and database.
Now, let’s start step by step to migrate wordpress website to AWS.
Step 1: Setup AWS EC2 instance creation with LAMP Stack
Login to AWS Console dashboard, launch an Ubuntu Instance . You can launch instance which is pre-configured with LAMP provided by bitnami.
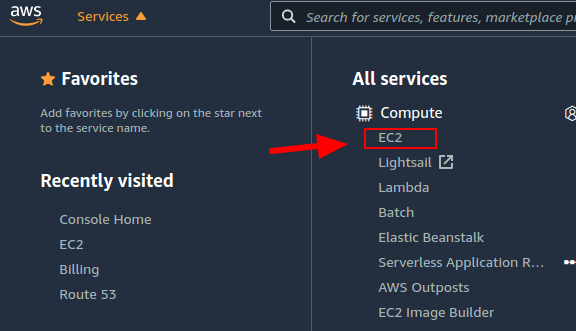
On EC2 Dashboard, click on the launch instances to start a new ec2 instance.

Now, Select the AMI from AWS Marketplace, as we are launching the instance that already pre-configured with LAMP.

Overview of bitnami LAMP AMI page, then select the AMI

Step 2: Choose Instance Type
You should choose the instance depends upon your requirement. If you are getting more than 500 user per day on your website. Don’t use free tier, otherwise you can use free instance.

Step 3: Configure Instance Details
On instance configuration page, keep all the default settings to launch the instance with key pair selection.

Step 4: Upload wordpress files and database backup to EC2 instance
Now you can upload all the WordPress files and database backup to the new instance by doing SCP using a key.
This instance is already pre-configured with the LAMP stack, so we don’t have to install the LAMP stack. Now, we need a MySQL password to create the database and import the database dump.
To find the bitnami MySQL password,click on actions. Now, under the action, click on Monitor and troubleshoot and then click get system log.

Check system log to find the bitnami MySQL password. The default bitnami password is same as MySQL password, however you can change it anytime.

Now, upload both WordPress and Database to the AWS Instance using following SCP(Secure Copy) command.
scp -i [keypair location] [file location of the upload file] bitnami@[IP Address]:[Path where you want to upload the file]
Example command
$ scp -i Downloads/serverkey.pem Downloads/website.zip [email protected]:~- SCP – Secure Copy
- keypair location – The location of the key file, you created during instance creation.
- IP Address – IP Address of the server.
Step 5: Database creation and import the old database.
Again SSH to the instance to create a database and import the database dump for the website by following commands.
SSH to the instance
$ ssh -i Downloads/techno.pem [email protected]Database Creation
$ mysql - u root -pPassword
$ mysql> CREATE DATABASE wordpressDb;
$ mysql> exit
Import the backup database
After logout from MySql Server, you have run MySQL database import command.
$ mysql -u root -p wordpressDb < databaseBackup.sqlIt will ask for password, you have to put MySQL password there.
To make sure your database imported successfully login to MySQL server and run the following command.
mysql> SHOW DATABASES;
mysql> USE wordpressDb;
mysql> SHOW tables;
Step 6: Copy WordPress files to document root
The uploaded wordpress files need to extract to the document root of the server.
Backup WordPress copy to document root
$ sudo mv wordpressBackup.zip htdocs
$ cd htdocs
$ sudo unzip wordpressBackup.zip
Now, you have to change the database information on wp-config.php file with new database credentials.
// ** MySQL settings - You can get this info from your web host ** //
/** The name of the database for WordPress */
define( 'DB_NAME', 'database_name_here' );

/** MySQL database username */
define( 'DB_USER', 'username_here' );

/** MySQL database password */
define( 'DB_PASSWORD', 'password_here' );

/** MySQL hostname */
define( 'DB_HOST', 'localhost' );
Step 7: Domain mapping (Locally)
To make sure the migrated website is working perfectly, you should check the website by mapping the domain locally on the system hosts file.
If you are using Ubuntu use the following command on your system.
$ sudo vi /etc/hostsAdd the following lines to your hosts file
[IP Address] yourdomainname.com
[IP Address] www.yourdomainname.com
Replace the IP Address with server IP Address and yourdomainname.com with your domain name.

If the website is loading perfectly, now you map the domain on Route53.
Step 8: Domain mapping on Route53 to make the site live
Open Route53 to create hosted zone, add your domain name to complete migrate WordPress site to AWS.

After hostedzone creation, add A records.

Check your domain on intodns to make sure NS updated.

Step 9: Update your domain SSL
Now update your domain SSL certificates. If you were using Let’s encrypt you can install it again, read how.

")
